 |
 |
 |
 |
 |
 |
 |
Printing
Most Solid Fluid applications support printing, with print preview. Typically printing is a three stage process starting from "page setup" working through "print preview" and concluding with "print". These three functions are available, where provided, through the menu system of an application.
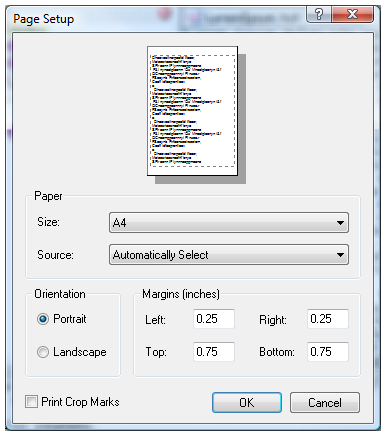
Invoking the page setup dialog will present the following dialog;

This dialog offers the normal page setup page associated with printing. The only notable feature is that this dialog offers the capability to specify that the crop marks should be printed. Later we'll see that the preview capability draws crop marks into the preview pane to make page margins clear. Selecting this option with actually cause those marks to appear on the output page.
Further, most printers will have some physical margin which is mandatory, used by the printer to handle the paper. Sometimes one is attempting to exceed the capability of the printer by printing one final page across two pieces of paper. The physical margins of the printer must be removed before the final page can be glued or taped together. In these circumstances having printed crop marks is useful ans a guide for a knife or cropping machine.
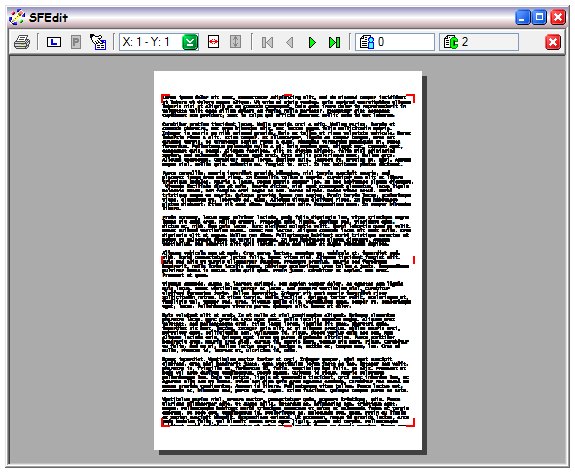
Before the actual print takes place it is useful to see how the final layout will be applied to the page. Print preview offers this capability. Selecting print preview will invoke a special application mode, which appears as follows;

As you can probably see from the diagram, the text for display is not particularly legible, and this is well represented by the application on a display surface. If the image is scaled in the preview mode the text can become legible, but it will be clear that it is not as good as the normal document view to look at. We can assure you that the print quality is better than the original document, and much better than the print preview pane, when on paper.
The primary reason for this discrepancy is scaling. The preview pane offers generic methods for displaying single and multiple pages, which require us to scale the document onto the display surface. In particular we are scaling to the aspect ratio of the paper at printer resolution, but outputting to the visual display which naturally has poorer resolution. We can scale such that the images in print preview have much more realistic quality, but it necessitates very much more intensive calculation, which is sluggish.
We feel that it is enough for a user to be able to see how big the paper is in relation to the content, if it's in colour, if the correct number and arrangement of pages has been specified and so on. If the user wishes to actually read the document on screen then, they'll probably do it through the normal document interface.
In the preview pane a single fixed toolbar is used. The buttons are divided into groups;
The first group on the far left, offers printing options. First is the print button which commits the previewed page to paper, via a printer specific dialog. We don't show the dialog here, because it depends completely on the user's printer hardware. If the printer supports extended options, like colour, then it may be possible to specify those options in the dialog, and have them represented in the preview pane. Ultimately, whatever you see in the preview pane (absolute pixel quality and crop marks aside) will appear on the printed page. Adjacent to the print button are buttons to control the orientation of the paper, and then a button to launch the page setup dialog previously described.
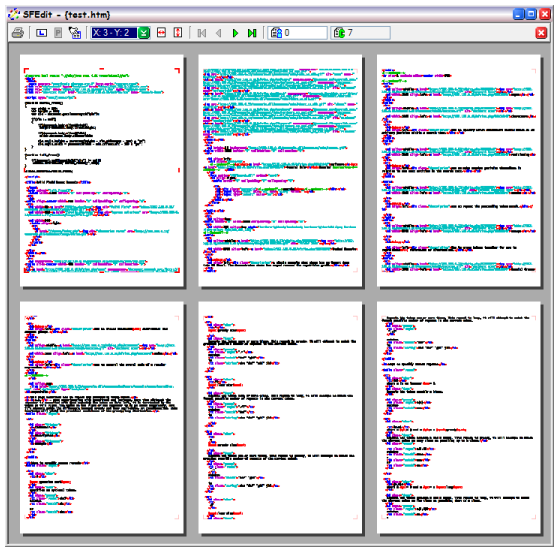
In the next group are the preview control buttons. The droplist allows preset counts of pages to be fitted to the application window. The buttons that follow the droplist allow a single page to be fitted to the application window either by width or height. These viewing layouts do not affect printing, but do affect the scaling in preview. The following screenshot illustrates variable print prviewing, showing six colour pages at once;

The final group of buttons control which page is viewed, of however many there are. The small arrows move either one page, or as far as possible, in either direction. Start, Previous, Next and Last. The numeric indicators show the current page (i)ndex, and the total (c)ount of pages. By clicking the (i) field it is possible to type a specific page index between 0 and count-1. The current page is considered to be that which displays the red crop marks.
The red close button on the right exits preview mode.
Copyright © Solid Fluid 2007-2025 |
Last modified: SolFlu Sun, 05 Jul 2009 17:14:48 GMT |